| Oracle7 Server Application Developer's Guide | Library |
Product |
Contents |
Index |
| Oracle7 Server Application Developer's Guide | Library |
Product |
Contents |
Index |
![]()
![]()
Note: Procedures, functions, and packages are discussed in Chapter 7; dependency information is in Chapter 11. If you are using symmetric replication, you should refer to Oracle7 Server Distributed Systems, Volume II for additional information on managing schema objects, such as snapshots. If you are using Trusted Oracle, there are additional privileges required and issues to consider when managing schema objects; refer to the Trusted Oracle7 Server Administrator's Guide.
A table can represent a single entity that you want to track within your system. Such a table might represent a list of the employees within your organization or the orders placed for your company's products.
A table can also represent a relationship between two entities. Such a table could be used to portray the association between employees and their job skills or the relationship of products to orders. Within the tables, foreign keys are used to represent relationships.
Although some well designed tables might both represent an entity and describe the relationship between that entity and another entity, most tables should represent either an entity or a relationship. For example, the EMP table describes the employees in a firm, but this table also includes a foreign key column, DEPTNO, which represents the relationships of employees to departments.
The following sections explain how to create, alter, and drop tables. Some simple guidelines to follow when managing tables in your database are included; see the Oracle7 Server Administrator's Guide for more suggestions. You should also refer to a text on relational database or table design.
CREATE TABLE emp (
   empno      NUMBER(5) PRIMARY KEY,
   ename      VARCHAR2(15) NOT NULL,
   job        VARCHAR2(10),
   mgr        NUMBER(5),
   hiredate   DATE DEFAULT (sysdate),
   sal        NUMBER(7,2),
   comm       NUMBER(7,2),
   deptno     NUMBER(3) NOT NULL
              CONSTRAINT dept_fkey REFERENCES dept)
   PCTFREE 10
   PCTUSED 40
   TABLESPACE users
   STORAGE (  INITIAL 50K
              NEXT 50K
              MAXEXTENTS 10
              PCTINCREASE 25 );
Your goal is to find a satisfactory tradeoff between densely packed data (low PCTFREE, full blocks) and good update performance (high PCTFREE, less-full blocks).
PCTFREE also affects the performance of a given user's queries on tables with uncommitted transactions belonging to other users. Assuring read consistency might cause frequent reorganization of data in blocks that have little free space.
PCTFREE for Non-Clustered Tables If the data in the rows of a non-clustered table is likely to increase in size over time, reserve space for these updates. If you do not reserve room for updates, updated rows are likely to be chained between blocks, reducing I/O performance associated with these rows.
PCTFREE for Clustered Tables The discussion for non-clustered tables also applies to clustered tables. However, if PCTFREE is reached, new rows from any table contained in the same cluster key go into a new data block chained to the existing cluster key.
PCTFREE for Indexes Indexes infrequently require the use of free space for updates to index data. Therefore, the PCTFREE value for index segment data blocks is normally very low (for example, 5 or less).
The default for PCTUSED is 40 percent; any integer between 0 and 99, inclusive, is acceptable as long as the sum of PCTUSED and PCTFREE does not exceed 100.
Example 1
Scenario: Common activity includes UPDATE statements that increase the size of the rows. Performance is important.
Settings:
PCTFREE = 20 PCTUSED = 40
Explanation:
PCTFREE is set to 20 to allow enough room for rows that increase in size as a result of updates. PCTUSED is set to 40 so that less processing is done during high update activity, thus improving performance.
Example 2
Scenario: Most activity includes INSERT and DELETE statements, and UPDATE statements that do not increase the size of affected rows. Performance is important.
Settings:
PCTFREE = 5 PCTUSED = 60
Explanation:
PCTFREE is set to 5 because most UPDATE statements do not increase row sizes. PCTUSED is set to 60 so that space freed by DELETE statements is used relatively soon, yet the amount of processing is minimized.
Example 3
Scenario: The table is very large; therefore, storage is a primary concern. Most activity includes read-only transactions; therefore, query performance is important.
Settings:
PCTFREE = 5 PCTUSED = 90
Explanation:
PCTFREE is set to 5 because UPDATE statements are rarely issued. PCTUSED is set to 90 so that more space per block is used to store table data. This setting for PCTUSED reduces the number of data blocks required to store the table's data and decreases the average number of data blocks to scan for queries, thereby increasing the performance of queries.
If you change the datatype (for example, from VARCHAR2 to CHAR), the data in the column does not change. However, the length of new CHAR columns might change, due to blank-padding requirements.
Use the SQL command ALTER TABLE to alter a table, as in
ALTER TABLE emp
   PCTFREE 30
   PCTUSED 60;
Altering a table has the following implications:
DROP TABLE emp;
If the table that you are dropping contains any primary or unique keys referenced by foreign keys of other tables, and you intend to drop the FOREIGN KEY constraints of the child tables, include the CASCADE option in the DROP TABLE command, as in
DROP TABLE emp CASCADE CONSTRAINTS;
Dropping a table has the following effects:
All operations performed on a view actually affect the base table of the view. You can use views in almost the same way as tables. You can query, update, insert into, and delete from views, just as you can standard tables.
Views can provide a different representation (such as subsets or supersets) of the data that resides within other tables and views. Views are very powerful because they allow you to tailor the presentation of data to different types of users.
The following sections explain how to create, replace, and drop views using SQL commands.
CREATE VIEW sales_staff AS
   SELECT empno, ename, deptno
   FROM emp
   WHERE deptno = 10
   WITH CHECK OPTION CONSTRAINT sales_staff_cnst;
The query that defines the SALES_STAFF view references only rows in department 10. Furthermore, the WITH CHECK OPTION creates the view with the constraint that INSERT and UPDATE statements issued against the view are not allowed to create or result in rows that the view cannot select. Considering the example above, the following INSERT statement successfully inserts a row into the EMP table via the SALES_STAFF view:
INSERT INTO sales_staff VALUES (7584, 'OSTER', 10);
However, the following INSERT statement is rolled back and returns an error because it attempts to insert a row for department number 30, which could not be selected using the SALES_STAFF view:
INSERT INTO sales_staff VALUES (7591, 'WILLIAMS', 30);
The following statement creates a view that joins data from the EMP and DEPT tables:
CREATE VIEW division1_staff AS
   SELECT ename, empno, job, dname
   FROM emp, dept
   WHERE emp.deptno IN (10, 30)
   AND emp.deptno = dept.deptno;
The DIVISION1_STAFF view is defined by a query that joins information from the EMP and DEPT tables. The WITH CHECK OPTION is not specified in the CREATE VIEW statement because rows cannot be inserted into or updated in a view defined with a query that contains a join that uses the WITH CHECK OPTION; see page 4 - 14 and pages 4 - 16 and following.
As an example, assume that the DEPT view is created as follows:
CREATE VIEW dept AS SELECT * FROM scott.dept;
Oracle stores the defining query of the DEPT view as
SELECT "DEPTNO", "DNAME", "LOC" FROM scott.dept
Views created with errors do not have wildcards expanded. However, if the view is eventually compiled without errors, wildcards in the defining query are expanded.
You can only create a view with errors by using the FORCE option of the CREATE VIEW command:
CREATE FORCE VIEW AS ...;
When a view is created with errors, Oracle returns a message that indicates the view was created with errors. The status of such a view is left as INVALID. If conditions later change so that the query of an invalid view can be executed, the view can be recompiled and become valid. Oracle dynamically compiles the invalid view if you attempt to use it.
      CREATE OR REPLACE VIEW sales_staff AS
          SELECT empno, ename, deptno
          FROM emp
          WHERE deptno = 30
          WITH CHECK OPTION CONSTRAINT sales_staff_cnst;
Replacing a view has the following effects:
SELECT * FROM division1_staff;
ENAME           EMPNO JOB       DNAME
---------- ---------- --------- --------------
CLARK            7782 MANAGER   ACCOUNTING
KING             7839 PRESIDENT ACCOUNTING
MILLER           7934 CLERK     ACCOUNTING
ALLEN            7499 SALESMAN  SALES
WARD             7521 SALESMAN  SALES
JAMES            7900 CLERK     SALES
TURNER           7844 SALESMAN  SALES
MARTIN           7654 SALESMAN  SALES
BLAKE            7698 MANAGER   SALES
With some restrictions, rows can be inserted into, updated in, or deleted from a base table using a view. The following statement inserts a new row into the EMP table using the SALES_STAFF view:
INSERT INTO sales_staff
   VALUES (7954, 'OSTER', 30);
Restrictions on DML operations for views use the following criteria in the order listed:
CREATE VIEW sales_staff AS
   SELECT empno, ename
   FROM emp
   WHERE deptno = 10
   WITH CHECK OPTION CONSTRAINT sales_staff_cnst;
Considering this view definition, you can update the EMPNO or ENAME fields of existing records, but you cannot insert rows into the EMP table via the SALES_STAFF view because the view does not let you alter the DEPTNO field. If you had defined a DEFAULT value of 10 on the DEPTNO field, you could perform inserts.
Referencing Invalid Views When a user attempts to reference an invalid view, Oracle returns an error message to the user:
ORA-04063: view 'view_name' has errors
This error message is returned when a view exists but is unusable due to errors in its query (whether it had errors when originally created or it was created successfully but became unusable later because underlying objects were altered or dropped).
DROP VIEW sales_staff;
In previous releases of the Oracle Server, you could not issue UPDATE, INSERT, or DELETE statements against a join view. Consider the following simple view:
CREATE VIEW emp_view AS
  SELECT ename, empno, deptno FROM emp;
This view does not involve a join operation. If you issue the SQL statement:
UPDATE emp_view SET ename = 'CAESAR' WHERE empno = 7839;
then the EMP base table that underlies the view changes, and employee 7839's name changes from KING to CAESAR in the EMP table.
However, if you create a view such as
CREATE VIEW emp_dept AS
  SELECT e.empno, e.ename, e.deptno, d.dname, d.loc
    FROM emp e, dept d    /* JOIN operation */
    WHERE e.deptno = d.deptno
      AND d.loc IN ('DALLAS', 'NEW YORK', 'BOSTON');
then in Oracle Server releases prior to 7.3 you could not modify either the EMP or the DEPT base table through this view, because it involves a join operation. A statement such as
UPDATE emp_dept_view SET ename = 'JOHNSON'
    WHERE ename = 'SMITH';
would have failed with an ORA-01732 error.
ORA-01732: "data manipulation operations not legal on this view"
Oracle7 release 7.3 allows you to modify such a view, subject to the restrictions described below.
A modifiable join view is a view that contains more than one table in the top-level FROM clause of the SELECT statement, and that does not contain any of the following:
CREATE TABLE dept (
        deptno   NUMBER(4) PRIMARY KEY,
        dname    VARCHAR2(14),
        loc      VARCHAR2(13));

CREATE TABLE emp (
        empno    NUMBER(4) PRIMARY KEY,
        ename    VARCHAR2(10),
        job      varchar2(9),
        mgr      NUMBER(4),
        hiredate DATE,
        sal      NUMBER(7,2),
        comm     NUMBER(7,2),
        deptno   NUMBER(2),
        FOREIGN KEY (DEPTNO) REFERENCES DEPT(DEPTNO));.
You could also omit the primary and foreign key constraints listed above, and create a UNIQUE INDEX on DEPT (DEPTNO) to make the following examples work.
Note: It is not necessary that the key or keys of a table be selected for it to be key preserved. It is sufficient that if the key or keys were selected, then they would also be key(s) of the result of the join.
Attention: The key-preserving property of a table does not depend on the actual data in the table. It is, rather, a property of its schema and not of the data in the table. For example, if in the EMP table there was at most one employee in each department, then DEPT.DEPTNO would be unique in the result of a join of EMP and DEPT, but DEPT would still not be a key-preserved table.
If you SELECT all rows from EMP_DEPT_VIEW defined ![[*]](jump.gif) above, the results are
above, the results are
EMPNO      ENAME      DEPTNO     DNAME          LOC
---------- ---------- ---------- -------------- -----
      7782 CLARK              10 ACCOUNTING     NEW YORK
      7839 KING               10 ACCOUNTING     NEW YORK
      7934 MILLER             10 ACCOUNTING     NEW YORK
      7369 SMITH              20 RESEARCH       DALLAS
      7876 ADAMS              20 RESEARCH       DALLAS
      7902 FORD               20 RESEARCH       DALLAS
      7788 SCOTT              20 RESEARCH       DALLAS
      7566 JONES              20 RESEARCH       DALLAS
8 rows selected.
In this view, EMP is a key-preserved table, because EMPNO is a key of the EMP table, and also a key of the result of the join. DEPT is not a key-preserved table, because although DEPTNO is a key of the DEPT table, it is not a key of the join.
):
UPDATE emp_dept
  SET sal = sal * 1.10
    WHERE deptno = 10;
The following UPDATE statement would be disallowed on the EMP_DEPT view:
UPDATE emp_dept
  SET loc = 'BOSTON'
    WHERE ename = 'SMITH';
This statement fails with an ORA-01779 error (``cannot modify a column which maps to a non key-preserved table''), because it attempts to modify the underlying DEPT table, and the DEPT table is not key preserved in the EMP_DEPT view.
In general, all modifiable columns of a join view must map to columns of a key-preserved table. If the view is defined using the WITH CHECK OPTION clause, then all join columns and all columns of repeated tables are not modifiable.
So, for example, if the EMP_DEPT view were defined using WITH CHECK OPTION, the following UPDATE statement would fail:
UPDATE emp_dept
  SET deptno = 10
    WHERE ename = 'SMITH';
The statement fails because it is trying to update a join column.
The following DELETE statement works on the EMP_DEPT view:
DELETE FROM emp_dept
  WHERE ename = 'SMITH';
This DELETE statement on the EMP_DEPT view is legal because it can be translated to a DELETE operation on the base EMP table, and because the EMP table is the only key-preserved table in the join.
In the following view, a DELETE operation cannot be performed on the view because both E1 and E2 are key-preserved tables:
CREATE VIEW emp_emp AS
  SELECT e1.ename, e2.empno, deptno
    FROM emp e1, emp e2
    WHERE e1.empno = e2.empno;
If a view is defined using the WITH CHECK OPTION clause and the key-preserved table is repeated, then rows cannot be deleted from such a view. For example:
CREATE VIEW emp_mgr AS
  SELECT e1.ename, e2.ename mname
    FROM emp e1, emp e2
      WHERE e1.mgr = e2.empno
      WITH CHECK OPTION;
No deletion can be performed on this view because the view involves a self-join of the table that is key preserved.
INSERT INTO emp_dept (ename, empno, deptno)
  VALUES ('KURODA', 9010, 40);
because only one key-preserved base table is being modified (EMP), and 40 is a valid DEPTNO in the DEPT table (thus satisfying the FOREIGN KEY integrity constraint on the EMP table).
An INSERT statement such as
INSERT INTO emp_dept (ename, empno, deptno)
  VALUES ('KURODA', 9010, 77);
would fail for the same reason that such an UPDATE on the base EMP table would fail: the FOREIGN KEY integrity constraint on the EMP table is violated.
An INSERT statement such as
INSERT INTO emp_dept (empno, ename, loc)
  VALUES (9010, 'KURODA', 'BOSTON');
would fail with an ORA-01776 error (``cannot modify more than one base table through a view'').
An INSERT cannot, implicitly or explicitly, refer to columns of a non-key-preserved table. If the join view is defined using the WITH CHECK OPTION clause, then you cannot perform an INSERT to it.
CREATE VIEW emp_dept_oj1 AS
    SELECT empno, ename, e.deptno, dname, loc
    FROM emp e, dept d
    WHERE e.deptno = d.deptno (+);
The statement
SELECT * FROM emp_dept_oj1;
results in:
EMPNO   ENAME      DEPTNO  DNAME          LOC
------- ---------- ------- -------------- -------------
   7369 SMITH           40 OPERATIONS     BOSTON
   7499 ALLEN           30 SALES          CHICAGO
   7566 JONES           20 RESEARCH       DALLAS
   7654 MARTIN          30 SALES          CHICAGO
   7698 BLAKE           30 SALES          CHICAGO
   7782 CLARK           10 ACCOUNTING     NEW YORK
   7788 SCOTT           20 RESEARCH       DALLAS
   7839 KING            10 ACCOUNTING     NEW YORK
   7844 TURNER          30 SALES          CHICAGO
   7876 ADAMS           20 RESEARCH       DALLAS
   7900 JAMES           30 SALES          CHICAGO
   7902 FORD            20 RESEARCH       DALLAS
   7934 MILLER          10 ACCOUNTING     NEW YORK
   7521 WARD            30 SALES          CHICAGO
14 rows selected.
Columns in the base EMP table of EMP_DEPT_OJ1 are modifiable through the view, because EMP is a key-preserved table in the join.
The following view also contains an outer join:
CREATE VIEW emp_dept_oj2 AS
    SELECT e.empno, e.ename, e.deptno, d.dname, d.loc
    FROM emp e, dept d
    WHERE e.deptno (+) = d.deptno;
The statement
SELECT * FROM emp_dept_oj2;
results in:
EMPNO      ENAME      DEPTNO     DNAME          LOC
---------- ---------- ---------- -------------- ----
      7782 CLARK              10 ACCOUNTING     NEW YORK
      7839 KING               10 ACCOUNTING     NEW YORK
      7934 MILLER             10 ACCOUNTING     NEW YORK
      7369 SMITH              20 RESEARCH       DALLAS
      7876 ADAMS              20 RESEARCH       DALLAS
      7902 FORD               20 RESEARCH       DALLAS
      7788 SCOTT              20 RESEARCH       DALLAS
      7566 JONES              20 RESEARCH       DALLAS
      7499 ALLEN              30 SALES          CHICAGO
      7698 BLAKE              30 SALES          CHICAGO
      7654 MARTIN             30 SALES          CHICAGO
      7900 JAMES              30 SALES          CHICAGO
      7844 TURNER             30 SALES          CHICAGO
      7521 WARD               30 SALES          CHICAGO
                                 OPERATIONS     BOSTON
15 rows selected.
In this view, EMP is no longer a key-preserved table, because the EMPNO column in the result of the join can have nulls (the last row in the SELECT above). So, UPDATE, DELETE, and INSERT operations cannot be performed on this view.
In the case of views containing an outer join on other nested views, a table is key preserved if the view or views containing the table are merged into their outer views, all the way to the top. A view which is being outer-joined is currently merged only if it is ``simple.'' For example:
SELECT col1, col2, ... FROM T;
that is, the select list of the view has no expressions, and there is no WHERE clause.
Consider the following set of views:
CREATE emp_v AS
  SELECT empno, ename, deptno
    FROM emp;

CREATE VIEW emp_dept_oj1 AS
  SELECT e.*, loc, d.dname
    FROM emp_v e, dept d
      WHERE e.deptno = d.deptno (+);
In these examples, EMP_V is merged into EMP_DEPT_OJ1 because EMP_V is a simple view, and so EMP is a key-preserved table. But if EMP_V is changed as follows:
CREATE emp_v_2 AS
  SELECT empno, ename, deptno
    FROM emp
      WHERE sal > 1000;
then, because of the presence of the WHERE clause, EMP_V_2 cannot be merged into EMP_DEPT_OJ1, and hence EMP is no longer a key-preserved table.
If you are in doubt whether a view is modifiable, you can SELECT from the view USER_UPDATABLE_COLUMNS to see if it is. For example:
SELECT * FROM USER_UPDATABLE_COLUMNS WHERE TABLE_NAME = 'EMP_DEPT_VIEW';
might return:
OWNER		TABLE_NAME		COLUMN_NAM		UPD
----------	----------		----------		---
SCOTT		EMP_DEPT_V		EMPNO			NO
SCOTT		EMP_DEPT_V		ENAME			NO
SCOTT		EMP_DEPT_V		DEPTNO			NO
SCOTT		EMP_DEPT_V		DNAME			NO
SCOTT		EMP_DEPT_V		LOC				NO
5 rows selected.
Without sequences, sequential values can only be produced programmatically. A new primary key value can be obtained by selecting the most recently produced value and incrementing it. This method requires a lock during the transaction and causes multiple users to wait for the next value of the primary key; this waiting is known as serialization. If you have such constructs in your applications, you should replace them with access to sequences. Sequences eliminate serialization and improve the concurrency of your application.
The following sections explain how to create, alter, use, and drop sequences using SQL commands. For instructions on tuning your sequences, see pages 4 - 29 and following.
CREATE SEQUENCE emp_sequence
   INCREMENT BY 1
   START WITH 1
   NOMAXVALUE
   NOCYCLE
   CACHE 10;
Notice that several parameters can be specified to control the function of sequences. You can use these parameters to indicate whether the sequence is ascending or descending, the starting point of the sequence, the minimum and maximum values, and the interval between sequence values. The NOCYCLE option indicates that the sequence cannot generate more values after reaching its maximum or minimum value.
The CACHE option of the CREATE SEQUENCE command pre-allocates a set of sequence numbers and keeps them in memory so that they can be accessed faster. When the last of the sequence numbers in the cache have been used, another set of numbers is read into the cache.
For additional implications for caching sequence numbers when using the Oracle Parallel Server, see the Oracle7 Parallel Server Administrator's Guide. General information about caching sequence numbers is included .
Use the SQL command ALTER SEQUENCE to alter a sequence, as in
ALTER SEQUENCE emp_sequence
   INCREMENT BY 10
   MAXVALUE 10000
   CYCLE
   CACHE 20;
Privileges Required to Alter a Sequence To alter a sequence, your schema must contain the sequence, or you must have the ALTER ANY SEQUENCE system privilege.
The examples outlined in the following sections show how sequences can be used in master/detail table relationships. Assume an order entry system is partially comprised of two tables, ORDERS (master table) and LINE_ITEMS (detail table), that hold information about customer orders. A sequence named ORDER_SEQ is defined by the following statement:
CREATE SEQUENCE order_seq
   START WITH 1
   INCREMENT BY 1
   NOMAXVALUE
   NOCYCLE
   CACHE 20;
NEXTVAL and CURRVAL are not reserved words or keywords and can be used as pseudo-column names in SQL statements such as SELECTs, INSERTs, or UPDATEs.
Generating Sequence Numbers with NEXTVAL To generate and use a sequence number, reference seq_name.NEXTVAL. For example, assume a customer places an order. The sequence number can be referenced in a values list, as in
INSERT INTO orders (orderno, custno)
   VALUES (order_seq.NEXTVAL, 1032);
or in the SET clause of an UPDATE statement, as in
UPDATE orders
   SET orderno = order_seq.NEXTVAL
   WHERE orderno = 10112;
or the outermost SELECT of a query or subquery, as in
SELECT order_seq.NEXTVAL FROM dual;
As defined, the first reference to ORDER_SEQ.NEXTVAL returns the value 1. Each subsequent statement that references ORDER_SEQ.NEXTVAL generates the next sequence number (2, 3, 4, . . .). The pseudo-column NEXTVAL can be used to generate as many new sequence numbers as necessary. However, only a single sequence number can be generated per row; that is, if NEXTVAL is referenced more than once in a single statement, the first reference generates the next number and all subsequent references in the statement return the same number.
Once a sequence number is generated, the sequence number is available only to the session that generated the number. Independent of transactions committing or rolling back, other users referencing ORDER_SEQ.NEXTVAL obtain unique values. If two users are accessing the same sequence concurrently, the sequence numbers each user receives might have gaps because sequence numbers are also being generated by the other user.
Using Sequence Numbers with CURRVAL To use or refer to the current sequence value of your session, reference seq_name.CURRVAL. CURRVAL can only be used if seq_name.NEXTVAL has been referenced in the current user session (in the current or a previous transaction). CURRVAL can be referenced as many times as necessary, including multiple times within the same statement. The next sequence number is not generated until NEXTVAL is referenced. Continuing with the previous example, you would finish placing the customer's order by inserting the line items for the order:
INSERT INTO line_items (orderno, partno, quantity)
   VALUES (order_seq.CURRVAL, 20321, 3);
INSERT INTO line_items (orderno, partno, quantity)
   VALUES (order_seq.CURRVAL, 29374, 1);
Assuming the INSERT statement given in the previous section generated a new sequence number of 347, both rows inserted by the statements in this section insert rows with order numbers of 347.
Uses and Restrictions of NEXTVAL and CURRVAL CURRVAL and NEXTVAL can be used in the following places:
The sequence cache consists of entries. Each entry can hold many sequence numbers for a single sequence.
Follow these guidelines for fast access to all sequence numbers:
If your applications use many sequences concurrently, your sequence cache might not be large enough to hold all the sequences. In this case, access to sequence numbers might often require disk reads. For fast access to all sequences, be sure your cache has enough entries to hold all the sequences used concurrently by your applications.
If the value for your SEQUENCE_CACHE_ENTRIES parameter is too low, it is possible to skip sequence values. For example, assume that this parameter is set to 4, and that you currently have four cached sequences. If you create a fifth sequence, it will replace the least recently used sequence in the cache. All of the remaining values in this displaced sequence are lost. That is, if the displaced sequence originally held 10 cached sequence values, and only one had been used, nine would be lost when the sequence was displaced.
The Number of Values in Each Sequence Cache Entry When a sequence is read into the sequence cache, sequence values are generated and stored in a cache entry. These values can then be accessed quickly. The number of sequence values stored in the cache is determined by the CACHE parameter in the CREATE SEQUENCE statement. The default value for this parameter is 20.
This CREATE SEQUENCE statement creates the SEQ2 sequence so that 50 values of the sequence are stored in the SEQUENCE cache:
CREATE SEQUENCE seq2
   CACHE 50
The first 50 values of SEQ2 can then be read from the cache. When the 51st value is accessed, the next 50 values will be read from disk.
Choosing a high value for CACHE allows you to access more successive sequence numbers with fewer reads from disk to the sequence cache. However, if there is an instance failure, all sequence values in the cache are lost. Cached sequence numbers also could be skipped after an export and import if transactions continue to access the sequence numbers while the export is running.
If you use the NOCACHE option in the CREATE SEQUENCE statement, the values of the sequence are not stored in the sequence cache. In this case, every access to the sequence requires a disk read. Such disk reads slow access to the sequence. This CREATE SEQUENCE statement creates the SEQ3 sequence so that its values are never stored in the cache:
CREATE SEQUENCE seq3
   NOCACHE
DROP SEQUENCE order_seq;
When you drop a sequence, its definition is removed from the data dictionary. Any synonyms for the sequence remain, but return an error when referenced.
Privileges Required to Drop a Sequence You can drop any sequence in your schema. To drop a sequence in another schema, you must have the DROP ANY SEQUENCE system privilege.
CREATE PUBLIC SYNONYM public_emp FOR jward.emp;
INSERT INTO emp (empno, ename, job)
   VALUES (emp_sequence.NEXTVAL, 'SMITH', 'CLERK');
If the synonym named FIRE_EMP refers to a standalone procedure or package procedure, you could execute it in SQL*Plus or Server Manager with the command
EXECUTE fire_emp(7344);
DROP SYNONYM emp;
The following statement drops the public synonym named PUBLIC_EMP:
DROP PUBLIC SYNONYM public_emp;
When you drop a synonym, its definition is removed from the data dictionary. All objects that reference a dropped synonym remain (for example, views and procedures) but become invalid.
Oracle does not limit the number of indexes you can create on a table. However, you should consider the performance benefits of indexes and the needs of your database applications to determine which columns to index.
The following sections explain how to create, alter, and drop indexes using SQL commands. Some simple guidelines to follow when managing indexes are included. See the Oracle7 Server Tuning manual for performance implications of index creation.
When you create an index on a table that already has data, Oracle must use sort space to create the index. Oracle uses the sort space in memory allocated for the creator of the index (the amount per user is determined by the initialization parameter SORT_AREA_SIZE), but must also swap sort information to and from temporary segments allocated on behalf of the index creation. If the index is extremely large, it might be beneficial to complete the following steps:
Index the Correct Tables and Columns Use the following guidelines for determining when to create an index:
for more information.
WHERE COL_X > -9.99 x 10^125
WHERE COL_X IS NOT NULL
The size of a single index entry cannot exceed roughly one-half (minus some overhead) of the available space in the data block. Consult with the database administrator for assistance in determining the space required by an index.
Limit the Number of Indexes per Table A table can have any number of indexes. However, the more indexes, the more overhead is incurred as the table is altered. When rows are inserted or deleted, all indexes on the table must be updated. When a column is updated, all indexes on the column must be updated.
Thus, there is a tradeoff between speed of retrieval for queries on a table and speed of accomplishing updates on the table. For example, if a table is primarily read-only, more indexes might be useful, but if a table is heavily updated, fewer indexes might be preferable.
Order Index Columns for Performance The order in which columns are named in the CREATE INDEX command need not correspond to the order in which they appear in the table. However, the order of columns in the CREATE INDEX statement is significant because query performance can be affected by the order chosen. In general, you should put the column expected to be used most often first in the index.
For example, assume the columns of the VENDOR_PARTS table are as shown in Figure 4 - 1.
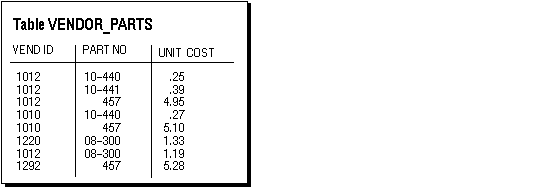 Figure 4 - 1. The VENDOR_PARTS Table
Assume that there are five vendors, and each vendor has about 1000 parts.
Suppose that the VENDOR_PARTS table is commonly queried by SQL statements such as the following:
SELECT * FROM vendor_parts
   WHERE part_no = 457 AND vendor_id = 1012;
To increase the performance of such queries, you might create a composite index putting the most selective column first; that is, the column with the most values:
CREATE INDEX ind_vendor_id
   ON vendor_parts (part_no, vendor_id);
Indexes speed retrieval on any query using the leading portion of the index. So in the above example, queries with WHERE clauses using only the PART_NO column also note a performance gain. Because there are only five distinct values, placing a separate index on VENDOR_ID would serve no purpose.
Oracle automatically creates an index to enforce a UNIQUE or PRIMARY KEY integrity constraint. In general, it is better to create such constraints to enforce uniqueness and not explicitly use the obsolete CREATE UNIQUE INDEX syntax.
CREATE INDEX emp_ename ON emp(ename)
   TABLESPACE users
   STORAGE (INITIAL 20K
            NEXT 20k
            PCTINCREASE 75)
   PCTFREE 0;
Notice that several storage settings are explicitly specified for the index.
DROP INDEX emp_ename;
If you drop a table, all associated indexes are dropped.
Privileges Required to Drop an Index To drop an index, the index must be contained in your schema or you must have the DROP ANY INDEX system privilege.
Choose Appropriate Tables to Cluster Use clusters to store one or more tables that are primarily queried (not predominantly inserted into or updated), and for which queries often join data of multiple tables in the cluster or retrieve related data from a single table.
Choose Appropriate Columns for the Cluster Key Choose cluster key columns carefully. If multiple columns are used in queries that join the tables, make the cluster key a composite key. In general, the same column characteristics that make a good index apply for cluster indexes; see the section "Index the Correct Tables and Columns" for more information about these guidelines.
A good cluster key has enough unique values so that the group of rows corresponding to each key value fills approximately one data block. Too few rows per cluster key value can waste space and result in negligible performance gains. Cluster keys that are so specific that only a few rows share a common value can cause wasted space in blocks, unless a small SIZE was specified at cluster creation time.
Too many rows per cluster key value can cause extra searching to find rows for that key. Cluster keys on values that are too general (for example, MALE and FEMALE) result in excessive searching and can result in worse performance than with no clustering.
A cluster index cannot be unique or include a column defined as LONG.
Like indexes, clusters do not affect application design. The existence of a cluster is transparent to users and to applications. Data stored in a clustered table is accessed via SQL just like data stored in a non-clustered table.
Once you create a cluster, tables can be created in the cluster. However, before you can insert any rows into the clustered tables, you must create a cluster index. The use of clusters does not affect the creation of additional indexes on the clustered tables; you can create and drop them as usual.
Use the SQL command CREATE CLUSTER to create a cluster. The following statement creates a cluster named EMP_DEPT, which stores the EMP and DEPT tables, clustered by the DEPTNO column:
CREATE CLUSTER emp_dept (deptno NUMBER(3))
   PCTUSED 80
   PCTFREE 5;
CREATE TABLE dept (
   deptno NUMBER(3) PRIMARY KEY,
   . . . )
   CLUSTER emp_dept (deptno);

CREATE TABLE emp (
   empno NUMBER(5) PRIMARY KEY,
   ename VARCHAR2(15) NOT NULL,
   . . .
   deptno NUMBER(3) REFERENCES dept)
   CLUSTER emp_dept (deptno);
You must create a cluster index before any rows can be inserted into any clustered table. For example, the following statement creates a cluster index for the EMP_DEPT cluster:
CREATE INDEX emp_dept_index
   ON CLUSTER emp_dept
   INITRANS 2
   MAXTRANS 5
   PCTFREE 5;
Note: A cluster index cannot be unique. Furthermore, Oracle is not guaranteed to enforce uniqueness of columns in the cluster key if they have UNIQUE or PRIMARY KEY constraints.
The cluster key establishes the relationship of the tables in the cluster.
To create a table in a cluster, you must have either the CREATE TABLE or CREATE ANY TABLE system privilege. You do not need a tablespace quota or the UNLIMITED TABLESPACE system privilege to create a table in a cluster.
To create a cluster index, your schema must contain the cluster, and you must have the following privileges:
You can allocate a new extent for a cluster using the SQL command ALTER CLUSTER with the ALLOCATE EXTENT option; see the Oracle7 Parallel Server Concepts & Administration manual for more information.
You can individually drop clustered tables without affecting the table's cluster, other clustered tables, or the cluster index. Drop a clustered table in the same manner as a non-clustered table--use the SQL command DROP TABLE. See page 4 - 9 for more information about individually dropping tables.
Note: When you drop a single clustered table from a cluster, each row of the table must be deleted from the cluster. To maximize efficiency, if you intend to drop the entire cluster including all tables, use the DROP CLUSTER command with the INCLUDING TABLES option. You should only use the DROP TABLE command to drop an individual table from a cluster when the rest of the cluster is going to remain.
You can drop a cluster index without affecting the cluster or its clustered tables. However, you cannot use a clustered table if it does not have a cluster index. Cluster indexes are sometimes dropped as part of the procedure to rebuild a fragmented cluster index. See page 4 - 37 for more information about dropping indexes.
DROP CLUSTER emp_dept;
If the cluster contains one or more clustered tables and you intend to drop the tables as well, add the INCLUDING TABLES option of the DROP CLUSTER command, as in
DROP CLUSTER emp_dept INCLUDING TABLES;
If you do not include the INCLUDING TABLES option, and the cluster contains tables, an error is returned.
DROP CLUSTER emp_dept INCLUDING TABLES CASCADE CONSTRAINTS;
An error is returned if the above option is not used in the appropriate situation.
CREATE CLUSTER trial_cluster (trialno NUMBER(5,0))
   PCTUSED 80     PCTFREE 5
   SIZE 2K
   HASH IS trialno HASHKEYS 100000;

CREATE TABLE trial (
   trialno NUMBER(5) PRIMARY KEY,
   ...)
   CLUSTER trial_cluster (trialno);
DROP CLUSTER emp_dept;
Drop a table in a hash cluster using the SQL command DROP TABLE. The implications of dropping hash clusters and tables in hash clusters are the same as for index clusters. See page 4 - 41 for more information about dropping clusters and the required privileges.
SELECT . . . WHERE cluster_key = . . . ;
ARRAY X[100] OF NUMBER(8)
      CREATE CLUSTER c(subscript INTEGER)
         HASH IS subscript HASHKEYS 100 SIZE 10;
      CREATE TABLE x(subscript NUMBER(2)), value NUMBER(8))
         CLUSTER c(subscript);
Alternatively, hashing is not advantageous in the following situations:
SELECT . . . WHERE cluster_key < . . . ;
If you decide to use hashing, a table can still have separate indexes on any columns, including the cluster key. For additional guidelines on the performance characteristics of hash clusters, see the Oracle7 Server Tuning manual.
For example, the following statement creates two tables and a view that joins data from the two tables:
CREATE SCHEMA AUTHORIZATION scott
   CREATE VIEW sales_staff AS
      SELECT empno, ename, sal, comm
      FROM emp
      WHERE deptno = 30  WITH CHECK OPTION CONSTRAINT
                         sales_staff_cnst
   CREATE TABLE emp (
      empno       NUMBER(5) PRIMARY KEY,
      ename       VARCHAR2(15) NOT NULL,
      job         VARCHAR2(10),
      mgr         NUMBER(5),
      hiredate    DATE DEFAULT (sysdate),
      sal         NUMBER(7,2),
      comm        NUMBER(7,2),
      deptno      NUMBER(3) NOT NULL
                  CONSTRAINT dept_fkey REFERENCES dept)
   CREATE TABLE dept (
      deptno      NUMBER(3) PRIMARY KEY,
      dname       VARCHAR2(15),
      loc         VARCHAR2(25))
   GRANT SELECT ON sales_staff TO human_resources;
The CREATE SCHEMA command does not support Oracle extensions to the ANSI CREATE TABLE and CREATE VIEW commands (for example, the STORAGE clause).
[schema.]name[@database]
Some examples include the following:
emp
scott.emp
scott.emp@personnel
A session is established when a user logs onto a database. Object names are resolved relative to the current user session. The username of the current user is the default schema. The database to which the user has directly logged-on is the default database.
Oracle has separate namespaces for different classes of objects. All objects in the same namespace must have distinct names, but two objects in different namespaces can have the same name. Tables, views, snapshots, sequences, synonyms, procedures, functions, and packages are in a single namespace. Triggers, indexes, and clusters each have their own individual namespace. For example, there can be a table, trigger, and index all named SCOTT.EMP.
Based on the context of an object name, Oracle searches the appropriate namespace when resolving the name to an object. For example, in the statement
DROP CLUSTER test
Oracle looks up TEST in the cluster namespace.
Rather than supplying an object name directly, you can also refer to an object using a synonym. A private synonym name has the same syntax as an ordinary object name. A public synonym is implicitly in the PUBLIC schema, but users cannot explicitly qualify a synonym with the schema PUBLIC. Synonyms can only be used to reference objects in the same namespace as tables. Due to the possibility of synonyms, the following rules are used to resolve a name in a context that requires an object in the table namespace:
Attention: If you drop an object and re-create it, all privilege grants for the object are lost when the object is dropped. Privileges must be granted again when the object is re-created.
Alternatively, a table, view, sequence, or a private synonym of a table, view, or sequence can be renamed using the RENAME command. When using the RENAME command, grants made for the object are carried forward for the new name. For example, the following statement renames the SALES_STAFF view:
RENAME sales_staff TO dept_30;
Renaming a schema object has the following effects:
Example 1 Listing Different Schema Objects by Type
The following query lists all of the objects owned by the user issuing the query:
SELECT object_name, object_type FROM user_objects;
The query above might return results similar to the following:
OBJECT_NAME               OBJECT_TYPE
------------------------- -------------------
EMP_DEPT                  CLUSTER
EMP                       TABLE
DEPT                      TABLE
EMP_DEPT_INDEX            INDEX
PUBLIC_EMP                SYNONYM
EMP_MGR                   VIEW
Example 2 Listing Column Information
Column information, such as name, datatype, length, precision, scale, and default data values, can be listed using one of the views ending with the _COLUMNS suffix. For example, the following query lists all of the default column values for the EMP and DEPT tables:
SELECT table_name, column_name, data_default
    FROM user_tab_columns
    WHERE table_name = 'DEPT' OR table_name = 'EMP';
Considering the example statements at the beginning of this section, a display similar to the one below is displayed:
TABLE_NAME  COLUMN_NAME     DATA_DEFAULT
----------  --------------- --------------------
DEPT        DEPTNO
DEPT        DNAME
DEPT        LOC             ('NEW YORK')
EMP         EMPNO
EMP         ENAME
EMP         JOB
EMP         MGR
EMP         HIREDATE        (sysdate)
EMP         SAL
EMP         COMM
EMP         DEPTNO
Notice that not all columns have a user-specified default. These columns assume NULL when rows that do not specify values for these columns are inserted.
Example 3 Listing Dependencies of Views and Synonyms
When you create a view or a synonym, the view or synonym is based on its underlying base object. The _DEPENDENCIES data dictionary views can be used to reveal the dependencies for a view and the _SYNONYMS data dictionary views can be used to list the base object of a synonym. For example, the following query lists the base objects for the synonyms created by the user JWARD:
SELECT table_owner, table_name
   FROM all_synonyms
   WHERE owner = 'JWARD';
This query might return information similar to the following:
TABLE_OWNER                    TABLE_NAME
------------------------------ ------------
SCOTT                          DEPT
SCOTT                          EMP
|
Prev Next |
Copyright © 1996 Oracle Corporation. All Rights Reserved. |
Library |
Product |
Contents |
Index |