

Integrating into a C/C++ Environment
Integrating Microsoft Visual C++
Developing 32-bit Applications
Use the following steps to integrate Pro*C/C++
into the Microsoft Visual C++ Version 4.2 environment:
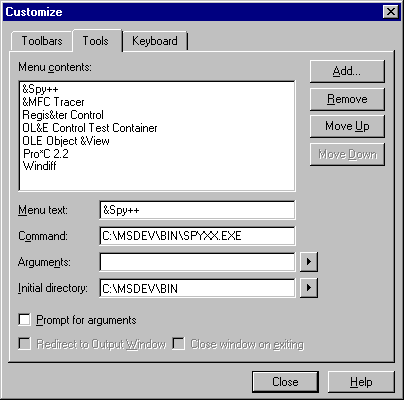
- From within Visual C++, select Customize from the Tools menu, then
click on the Tools tab. The Customize screen appears.

- To add another tool to the Tools list, select the Add button. The Add
Tool dialog box appears.
- From the C:\ORANT\BIN directory, select PROCUI30.EXE, and then
choose OK.
The Customize screen re-appears. The Command and
Menu Text fields are automatically filled in with appropriate Pro*C/C++
information. Type $(TargetName) in the Arguments field and $(WkspDir) in
the Initial directory field.
When you select "Pro*C/C++ 3.0" from
the menu, the $(TargetName) argument is used to pass the name of the current
development project to Pro*C/C++. Pro*C/C++ then opens a precompile project
with the same name as the opened project, but with a .pre extension in
the project directory.
- Choose Close to add the new option to the list under the Tools menu
item.
Developing 16-bit Applications
Use the following steps to integrate Pro*C/C++
into the Microsoft Visual C++ Version 1.52c environment:
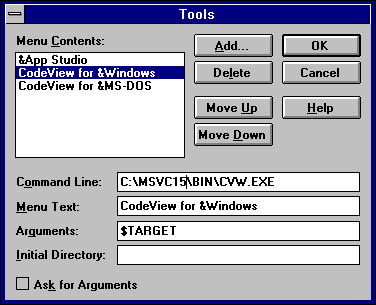
- From within Visual C++, select Tools from the Options menu. The Tools
dialog box appears.
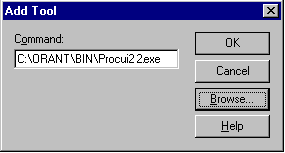
- To add another tool to the Tools list, select the Add button. The Add
Tool dialog box appears.
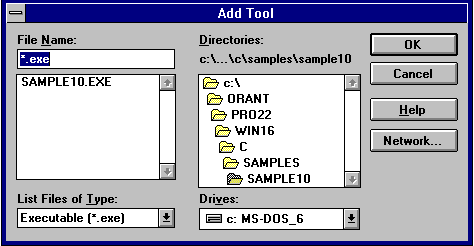
- From the %ORACLE_HOME%\BIN directory, select PROCUI22.EXE and then
select the OK button.
The Tools dialog box re-appears. The Command Line
and the Menu Text fields are automatically filled in with appropriate Pro*C
information.
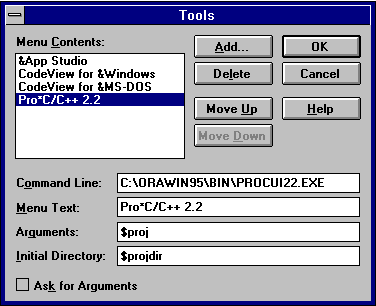
- Enter $proj in the Arguments field.
- Enter $projdir in the Initial Directory field.
- Once you have filled out all the fields, choose the OK button. This
adds the new option to the list under the Tools menu item.
When you select Pro*C/C++ 2.2 from the menu, the
$Proj argument is used to pass the name of the current development project
to Pro*C/C++. Pro*C/C++ then opens a precompile project with the same name
as the opened project, but with a .PRE extension in the project directory.
Integrating Pro*C/C++ within Microsoft Visual C++ Projects
Use the following steps to directly integrate Pro*C/C++
with Microsoft Visual C++ Version 4.2 project. Microsoft Visual C++ maintains
the dependency and precompile files if needed. All the precompiler errors
and warnings are displayed in the output box where Microsoft Visual C++
displays compiler and linker messages. Now, you do not have to precompile
a file separately from the Microsoft Visual C++ build environment. More
importantly, Microsoft Visual C++ maintains the dependency between .c and
.pc files.
In the following steps, SAMPLE.PC is a sample source
file that when precompiled, creates SAMPLE.C.
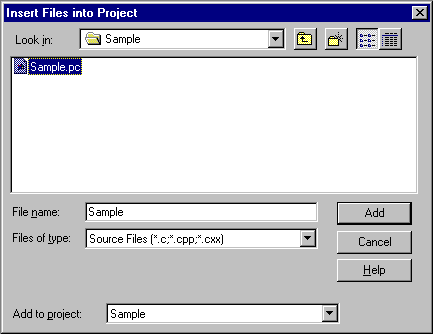
- Create a New project sample and add sample.pc into the project using
"Insert" menu option then "Files into Project" in the
menu list.
- Add sample.c into the Sample project using "Insert" menu
option then "Files into Project" in the menu list.
|
Note Currently,
sample.c does not exist, therefore Microsoft Visual C++ displays a message
box prompting, "This file does not exist. Do you want a reference
added to the project anyway?" Click on Yes.
|
- Click on the "Build" menu option and select the "Settings"
option. Click on the "Custom Build" tab. In the "Setting
For " screen, expand both the debug and release projects by clicking
on the "+"sign. Then select sample.pc from both debug and release
settings.
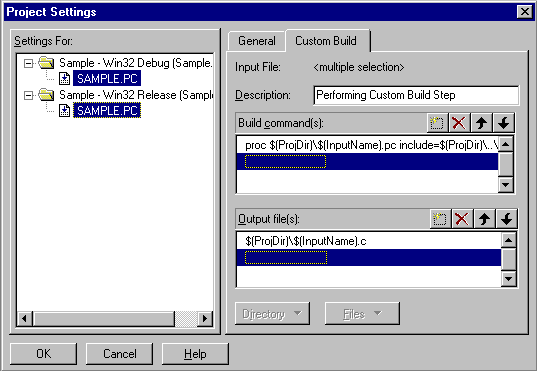
- In the "Build command(s)" field, enter:
proc $(ProjDir)\$(InputName).pc include=c:

\orawin95\pro30\c\include
- In the "Output Files" field, enter:
$(ProjDir)\$(InputName).c
- Choose OK to accept the settings.
- Add sqllib19.lib to your project.
- Include Pro*C/C++ header files directory by first selecting the Tools
option from the menu bar and then choosing Options. Click on the Directories
tab and select "Include Files" from the "show directories
for" list box. Add the directory, "%oracle_home%\pro30\c\include"
where %oracle_home% must be replaced by your designated oracle home directory.
Then click OK.
|
Note For Microsoft
Visual C++ to run Pro*C/C++, it needs to know the directory path for the
Pro*C/C++ executable. If this is the first time you have installed Oracle,
then you need to add the directory path. From the "Tools"menu
option, select "Options". Then from the Options dialog box, click
on the "Directories" tab. Select "Executable files"
from "Show directories for:" dropdown list box. Make sure that
c:\ORAWIN95\BIN is listed under executable files. If it is not listed,
then add this directory path to the list.
|
Integrating with Borland C++
Developing 16-bit and 32-bit Applications
Use the following steps to integrate Pro*C/C++
into the Borland C++ Version 5.0 for both the 16- and 32-bit environment:
- From within Borland C++, select Tools from the Options menu.
The Tools dialog box appears.
- To add another tool, choose the New button.
The Tool Options dialog box appears.
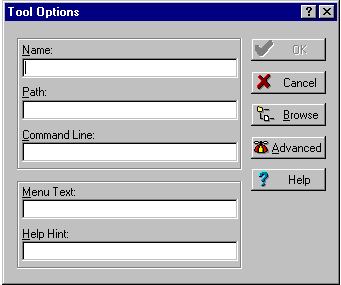
- Choose the Browse button. The Tool Path dialog box appears.
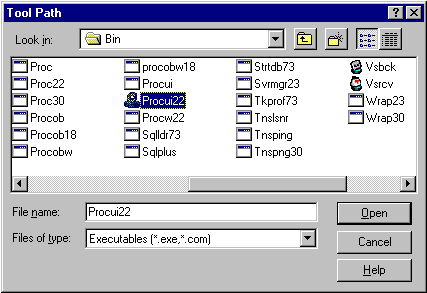
- Select PROCUI22.EXE from the %ORACLE_HOME%\BIN directory.
- Choose the OK button.
The Tool Options dialog box reappears with the
Path field automatically filled in.

- Enter a suitable name, such as Pro*C/C++ for Windows, in the Name field.
- Enter $PRJNAME in the Command Line field.
- Enter a suitable name, such as Pro*C/C++ 2.2, in the Menu Text field.
- Enter Precompile in the Help Hint field. This help text is displayed
when you select Pro*C from the Tools list or the menu bar in the Tools
dialog box.
- Once you have filled out all the fields, choose the OK button. This
adds the new option to the list in the Tools dialog box.
When you select Pro*C from the menu, the $PRJNAME
argument is used to pass the name of the current development project to
Pro*C/C++. Pro*C/C++ then opens a precompile project with the same name
but with a .PRE extension in the project directory.